domenica 30 dicembre 2012

Croquembouch or festive choux pastry mountin


After several choux pastry expierments (that surprisingly turned out succsseful) I was looking for a dessert that will wow my in-laws on christmas eve dinner (we were invited at their house) First, I thought of Eclairs or Profitterols, but those sounded quite banal for a christmas eve dessert.Then I remember seeing a recipe of a croquembouch a while ago from Tova Aran's book: "home baking ."
It looked very festive and inviting, so after acquiring some basic understanding of the choux pastry,
I decided to make this festive french dessert . It is choux pastry puffs, filled with pastry cream ,assembeled into a mountin like presentation and glued with a caramel frosting so puffs will hold on to each other. Afterwards , it is decorated with caramel drags.In France this desseret is served at weddings and christnings. I used some minimal christmas decorations cut out of  some sugar paste for an extra wow-effect.The open jaws that night when seeing this beauty were priceless. I am sure you will have the same reaction if you will prepare this for the new year's eve dinner.I made some changes in the original recipe.

Croquembouch

Ingredients for the choux pastry

Makes 40 small puffs

1 cup water
6 tablespoons butter (85 gr) cut in pieces
1 teaspoon sugar
1/2 teaspoon salt
1 cup all purpose flour
4 medium eggs

Method


Preheat oven to 210°c.
In a sauce pan, put together water,butter, sugar and salt on a medium heat. As soon as butter has melted and water starts to boil , remove from fire. Stir in flour, all at once and mix using a wooden spoon for a whole two minutes.Continue to mix until dough detaches from sides of the pan and forms a ball. The heat of the pan will help remove the raw taste of the flour. Put dough in a large bowl and use a hand mixer on  a low speed to release some steam ( attention, you don't want to over cool dough as it is important to work with choux pastry and pipe it while still warm) Add eggs , one at a time and mix vigorously after each addition. Dough will look like it is breaking down,don't panic and continue mixing as dough will go back to it's normal shape as soon as egg has been well absorbed .Use a wooden spoon to mix eggs, you have to have a strong arm and work quickly.You might not need to use all four eggs, just make a test after the addition of the third egg. To make the test, take a pinch of the dough between your thumb and your index finger and try to strech the dough between them, if dough is sticky and streches between two fingers, then it's ready for pipping. If not,then you need to use the fourth egg  and make the test again. When dough is ready, put it quickly in a pipping bag and pipe the puffs on a baking sheet that has been lined with parchment paper in advance.Use a tip of 1-1 1/2 cm in diameter in order to form the puffs. When pipping, keep in mind that each puff will double in size from all directions so leave an adequate space between them. Bake puffs at 210°c for 20 minutes. It is strictly important not to open the oven door during that time or else you will end up with soggy puffs!


Pastry Cream (For puffs filling)


Ingredients

2 cups milk

4 egg yolks

1/4 cup sugar

1/4 cup flour

1 vanilla bean


Method

Cut vanilla bean in half, put it with seeds and milk in a medium sauce pan on a low fire. Heat milk with vanilla bean until just starts to simmer. In the meanwhile, beat eggs until light and fluffy.Add sugar and continue to beat until thick and light in color. Add flour gradually and continue beating on low speed just until incorporated. Remove milk from fire then add 4-5 tablespoons of it to the eggs and flour mixture. Mix for one minute, then add rest of the milk gradually and continue mixing. Return milk and eggs mixture to the sauce pan and continue stirring on a low fire with a wooden spoon until mixture thickens and starts to simmer. Remove from fire and cover surface of pastry cream with a cling film to prevent it from forming a crust. Put in the fridge and cool completely until use.


Caramel

Ingredients

2 cups sugar
1/3 cup water

Method

In a medium pot, boil 6 cups of water (this will help to keep the caramel from hardening once ready)
Heat a Teflon pan , then gradually add sugar. First add only 1/2 a cup with 1/3 cup water. Then when sugar dissolves, add the rest of the sugar slowly and continue to mix until a honey colored caramel is obtained. Pour the caramel into a little pot, and let it stand inside a pot with the hot water in order to keep it liquid.


Assembeling the Croquembouch

After filling the Puffs with pastry cream, (make a little hole on the side of the puffs then using a round tip, fill them with the  cream) position the puffs on a large tray in a  mountin like shape. Dip the bottom part of each puff with the caramel and adhere it to the rest of the puffs like illustrated in the photos, until you reach the top of the mountin. Use a tablespoon to pour the  remaining caramel on puffs' moutin  from top to bottom.

Happy baking and happy new year!
venerdì 29 giugno 2012

Cheesy Hills


I love cheese cakes! I tried them in every possible variation.My favourite cheese cake is a baked cheese cake.Back home, my mother used to make them quite often. I remember the smell of a cheese cake while still baking in the oven and our face stuck into the oven door waiting for the cheese cake to get done.My mother used to complain about the fact that her cheese cakes never made their way to the fridge for chilling because we used to eat it all to the last crumb while still warm." don't open the oven door!" my mother used to shout everytime I would tell her to run quickly because the cheese cake was reaching the outside of the cake pan, and she would shout again " levae it, do not open that door ,it will fall down." This is why cheese cakes always freaked me out, baked cheese cakes I mean.They always looked so difficult to bake.But as many recipes that came to life in my kitchen when I came to Italy, cheese cake also started to be a star on saturdays and sundays after dinner or lunch. And soon I started to bake cheese cakes like a pro! ( well maybe not that pro, but as good as my mother, which is a pro to me) Now cheese cakes can be very tricky when it comes to baking them, there are some rules you have to follow otherwise, your cheese cake is doomed to a flat, pie like, cracked presentation:

1)When using fresh cream cheese in baking a cheese cake, you have to drain the accsess water out of the cheese using a cheese cloth (a pillow case will work just fine!)

2)It's wisely advisable to use parchment paper when baking a cheese cake, don't just put it at the bottom of the pan, put it also arround the edges at the inside of the pan.Just make sure to go 3 or 4 cm above the edges hight, because cheese cakes tend to rise and go much beyond the edges and then they suddenly fall after baking is done. So parchment paper will help in keeping the cake from spilling outside of the pan.

3)Tempreture: In the first 10 minute of baking the cake, you have to bake it at high tempreture, 200 c°. Afterwards, lower the heat to medium high, 180c° and continue to bake it for another 1 hour and 15 min.

4)When baking is done, DO NOT TAKE THE CAKE OUT OF THE OVEN! let it cool inside the
oven(after turning it off) for 3/4 an hour.

You see? it is not that difficult, just follow those simple rules and it's a piece of cake :-)

I wanted to bake a fancy cheese cake for some ladies that were coming over for a tea and a cake so I chose a cheese cake with Meringue puffs on top and some caramelized almonds, the recipe is taken from the book : "Home Baking" by Tova Aran

Cheese Cake With Meringue Puffs And Carmalized Almonds e

Ingredients


1 pie crust (you can find the recipe here)

6 egg whites

A pinch of salt

Half a cup sugar


6 egg yolks

half a cup sugar

1 teaspoon vanilla extract

1 teaspoon of lemon zest

1 cup sour cream(170 ml)

3 spoonfull tablespoon of corn starch

750 gr cream cheese , drained.

1 table spoon of lemon juice


For coating:

5 egg whites

3/4 a cup sugar

A pinch of salt

1/4 teaspoon tartar cream

150 gr confectioner's sugar


For Garnish: Cramelized almonds.

Method:

1.Prepare the pie crust as instructed ,preheat oven to 190c°. 2.Greas a round baking pan of 26-28 cm and line bottom with parchment paper, put the crust dough in the baking pan and bake as instructed. 3.Beat egg whites with salt and sugar until shine and ferm. 4.Beat egg yolks separetly with half a cup sugar until light and foamy,add vanilla ,lemon zest cream and corn starch, continue to beat with an electric mixer on a low speed for a whole minute. 5.Alternately,add the cream cheese, the beaten egg whites and the lemon juice to the egg yolks mixture. 6.Pour batter into the baking pan and bake for 10 minutes at 190°c. Reduce heat to 170°c and bake for 1 hour. Meringue 1.Beat egg whites with 1/4 teaspoon salt, sugar and tartar cream until you get ferm peaks . 2.Gentley fold the confectioner's sugar into the meringue batter. Put batter into a pipping bag with a round tip of 1cm diameter. After cake is baked, pipe the meringue puffs on top and sprinkle cramelized almonds. 3.Heat the oven to 240°c , and bake carefully without moving away from the oven ,until meringues are nicely golden. Happy Baking!

domenica 20 maggio 2012

Time for friends


I am a person of friends, for me friends are like oxygen.I can't live without them.
Friends for me are a reassurance of free will ,optimism and independence.And without those,I can't see myself existing.Before I came to Italy, I had a lot of friends back home, lots of kinds of friends (at some point in your life, you realise that the one and only friend module just doesn't work)Well,I made few friends since I came to live in Italy and I am really happy I met these people at this stage in my life.It is one thing dealing with a forigne country when you are all alone , and it's a total different thing when you have friends. Nonetheless when they are trying to get used to this country as well (you can vent about same things together, a great therapy)
I love having friends over, especially when we are getting together for a dinner or lunch. But meeting friends for brunch is something that I really like. I love the easy going invironment that surronds this time of the day,the laughs, good talks and all the baked goods that we usually have when we get together . So when I have friends for brunch, I love spoiling them by doing the thing I love doing the most, that is :baking!
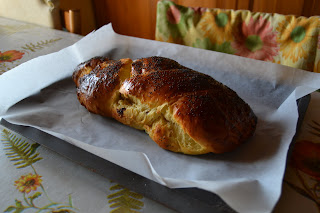
Last sunday I had a friend coming over with her kids and we were both excited about having a brunch outside on the balcony, it was really nice : kids were playing ,we were talking, eating and drinking. When the Challa I baked that day came out, it was like the cherry on top of the wipped cream. Everybody loved the Challa I baked for brunch and soon it was all vanished and disappeared. I took the recipe for this chala from Smitten's Kitchen.
Challa (makes two loaves of straight braided challa) Ingredients 1 1/2 packages active dry yeast (11 grams) 1 tablespoon (13 grams) plus half cup sugar 1/2 cup vegetable oil , plus more for greasing the bowl 5 large eggs 1 tablespoon (14 grams)salt 1 kg all-purpose flour 1/2 cup raisins (about 70 grams), soaked in hot water and drained poppy or sesame seeds for sprinkling Method Use a large bowl to dissolve yeast and 1 tablespoon sugar in 1 3/4 cups lukewarm water. 2. Wisk oil into yeast, then beat in 4 eggs, one at a time , with the remaining sugar and salt. Gradually, add flour. When dough holds together , it is ready for kneading. 3. turn dough into floured surface and knead until smooth. Clean out bowl and greas, then return dough into the bowl. Cover with a plastic wrap, and let it rise in a warm place for one hour , until almost doubled in size .Punch down dough, cover and let rise again in a warm place for another half an hour. 4.Knead the raisins into the challa. To make a 6 braid challa, take half the dough and form it into 6 balls . With your hands , roll each ball into a strand 22 cm long and 1/2 cm wide.Place the 6 strands in a row , parallel to one another. Pinch the tops of the strands together and start making a braid, then tuck the ends underneath. Put braided loaves on a baking sheet lined with parchment paper with a space of at least 2 cm in between. 5.Beat the 5th egg and brush it on the loaves, let rise for another hour. 6.Preheat oven to 180°c and brush loaves with egg again, sprinkle bread with poppy seeds or sesame. 7. Bake in middle of oven for 30 to 40 minutes, or until golden. Note: You can freez challa and take it out one hour before eating, it will still taste
still taste good. This challa bread makes a wonderful breakfast with james or whatever spreads you like to use with it. Happy Baking!

giovedì 12 aprile 2012

Sulo a Napule ò sanno fà...


I remember when I got married with my husband, a pure Napolitan, I didn't dare cooking any Italian food (God forbid Napolitan!)because I was affraid of critisim.Everytime I cooked pasta, it was either overcooked or there was not enough salt in the water.I wouldn't dare telling my husband or his relatives that fusili tastes like penne and mezze penne and farfalle.One day ,I cooked lasagna(or lasagne as Milanese call it)for lunch and I was pretty enthusiastic about the result.On that same day, my mother-in-law called us to ask how things were going. When I told her that we were having lasagna for lunch,her first comment was :" Lasagna??! who cooked it?" The little voice inside my head told me :" Don't mess with a Napolitan mother-in-law" so I lied and said that my husband did. "oh weh" her answer was(which means ahhhhhh in Napolitan), with a big relief that her son wouldn't have to eat some disastrous food made by a non Napolitan woman.Five years after that and after two kids, my husband got used to the fact that I can cook a good enough pasta for him to eat,otherwise he would have to cook dinner.

I cooked many Italian dishes so far ,and some Napolitan dishes as well.But there is one thing I could never touch because it is "sacred" according to my husband ,and that is : The Pastiera ,or as Napolitans call it : A' PASTIERA.
It's a ricotta and wheat grain filled pie that is eaten arround and in easter time.I remember the first time I ate Pastiera I was totaly in love. It is not too sweet and the pie crust is perfect.Usually we would eat Pastiera at my sister's-in-law house for easter, but two years ago, my husband decided we should start making our own Pastiera .So he seriously took it as a challenge, and I must say, the result was well worth it.This recipe is my husband's recipe and it has been running in his family ever since he remembers himself.
I know that easter is behind us now, but in my husband's family , anytime is a good time for a good Pastiera (fatta in casa!)


Happy Baking!


Pastiera Napolitana


Ingredients


For a 24cm pie pan

Pie Crust


300 gr flour

3 egg yolks

150 gr custer sugar

150 gr butter


Filling


350 gr ricotta cheese

350 gr custer sugar

200 gr wheat grains (soaked in water for over a night)

140 ml milk

A pinch of salt

A zest of one lemon

A zest of one orange

5 eggs (separated into egg whites and yolks)

1 teaspoon cinnamon

2 teaspoons rose water

1 tablespoon butter

1 teaspoon vanilla extract

Method

On a flat surface ,put the flour and make a hole in the middle. In that hole, put egg yolks , butter and sugar and start to mix all ingredients together with your hands until it holds into a dough shape, then start to knead the dough until you obtain a non sticking ball. You have to work very fast when kneeding this dough, otherwise it will not be crispy enough. Put the dough in a cling film and leave it in the fridge for one hour. On a medium-low fire, cook together : milk, wheat grains,one tablespoon butter, vanilla extarct, salt and lemon zest. Keep stiring until you have a creamy consistency (it should take about 15 min)let cool aside.

Using an electric mixer, beat egg whites until you've reached a soft peak consistency.
In a separate bowl,soften the ricotta cheese using a spoon, then add sugar, egg yolks (followed by mixing) then once at a time, add cooled wheat grains mixture, rose water , cinnamon,orange zest, and at the end beaten egg whites, working it from bottom to top.Use two thirds of the pie dough to cover a greased pie pan , then pour over the Ricotta and wheat grains filling. With the remaining pie dough,make stripes (1 cm wide) and put them one above the other as seen in the photo. Bake at 180°c for about one hour and a half. After cooling pie, dust it with some confectioner's sugar.

This pie is at it's maximum , two days after it's baked.


sabato 11 febbraio 2012

Winter, oranges and between...


I had some oranges in the fruit bowl, waiting for somebody to pick them up and eat them or squeez them and drink them. For heaven's sake just anything would be fine. But nothing, DD and DH didn't have the mood for oranges this year I guess and I was too busy and too lazy to peel an orange and eat it without beeing interupted by diaper changing,feeding or chasing after my little Mary Poppins.I felt really sorry for them, they were so beautiful ,round and juicy and I just didn't have the heart to let them rot in that fruit bowl.So I decided to make a cake with them. Why not? It's winter, oranges are in season, so they taste heaven, and so would the cake I believe.I looked in the internet for some orange cakes recipes,and I didn't like any of the recipes that I found. At the end, I remembered that I had a recipe for an easy Orange cake on my Moulinex booklet (As funny as it might sound, this cake was the best orange cake I have ever tasted so far) it is easy, rich and moist but there is one problem with this cake: It will not survive until the next day, and you will feel such a pig because of that!

Happy Baking!

Orange Cake
makes 6 servings

Ingredients
175 gr flour
175 gr custer sugar
175 gr butter (room tempreture)
2 ts baking powder
3 eggs
A juice of 4 oranges (1/4 for the cake and 3/4 for the orange glaze)
A zest of two oranges
Coconut flakes for garnish (optional)

For the glaze:
125 gr confectioners' sugar
3/4 orange juice

Method
Beat eggs and sugar with an electric mixer for a minute.Add butter and mix for another minute.Add flour, baking powder and zest and mix just until incorporated.Finally, add 1/4 orange juice and mix for another 30 sec.Pour mixture into a greased and dusted 26cm pan and bake for 40 minutes at 160°c or until a skewer inserted in the middle of the cake, comes out clean.

Orange Glaze:
In a small saucepan,put together confectioners' sugar and 3/4 orange juice and bring to simmer for 7 minutes on a medium fire. when glaze is ready, pour on cake while still hot and sprinkle over the coconut flakes.


Soy and ketchup chicken


One year ago, in one of our visits to my family I happened to taste the most delicious and moist chicken I've ever had in my life. I am not exaggerating! I like to cook chicken because you can always vary with the recipe, plus children love chicken. So this one was my sister's recipe, she prepared it for us the night we came from the airport because she thought it was light enough.(considering the fact we arrived late that night) It was a chicken with soy and ketchup , it was really delicious and we devoured that chicken right away. I still cook this chicken and my husband is amazed everytime I cook it like it was the first time he tasted it.
This is one of the recipes you should keep for those evenings when you come back from work, open the fridge and ask yourself desperately :" What the hell am I going to cook tonight?"

Happy cooking!

Soy and ketchup chicken

Ingredients
Two portions

500 gr chicken with bones (any pieces of your preferance we just love the thighs)
1 tbs ketchup
5 tbs soy sauce
1 tbs olive oil
1 tb honey
1 ts salt

Method


Wash the chicken pieces thoroughly then pat dry. In a high edged bowl,put together soy sauce, ketchup, honey , olive oil and salt and mix. Put chicken inside the sauce and rub it well with your hands. Let marinate for half an hour in the sauce making sure to turn pieces over from time to time. Put chicken pieces in a pan then pour all sauce on it. Cook in a preheated oven at 180°-200° for 40 minutes.


lunedì 6 febbraio 2012

Say it with a heart!


Valentine is right at the corner,you can tell by all the hearts and kitschy gifts shown at the displays at most shops here.It is funny that people spend so much money on a day when all you have to do is a little gesture of love, little words that mean a lot and little things that bring joy to the toughest guy on the block!
So to mark the occasion,I decided to bake chocolate cupcakes with a chocolate chantilly cream frosting and sugar hearts for decorations.After all, what is better than chocolate and hearts to tell your other half what's on your mind? These cupcakes are rich in a dark chocolate flavour and are so moist that you will reach on for the second cupcake before even you finish the first one!
I included a recipe and a tutorial for the sugar hearts at the end of this post.
I hope you'll enjoy making and eating these beautiful creatures as much as I did.

Happy Baking!

Valentine chocolate cupcakes with sugar hearts

Ingredients

makes 12 cupcakes

210 gr flour
200 gr sugar
3/4 cup dark cocoa
2 ts baking powder
1/4 ts baking soda
1/8 ts salt
1 ts rum (you can use vanilla if you wish)
1/3 cup oil (not olive oil)
1 cup milk

Method
Preheat oven to 175°,line a muffin tray with 12 muffin cups.
Sift together dry ingredients: flour,baking soda, baking powder, cocoa and salt and set aside. In a separate bowl, whisk sugar and oil until light and fluffy.
Add rum and whisk gently just until incorporated. Pour mixture, using two table spoons ,into cups just until 3/4 of them. Bake for 15-17 minutes or until a skewer inserted in the cupcakes comes out clean. let cool completely before frosting.

Chocolate chantilly cream

Ingredients

150 gr fine dark chocolate
250 gr heavy cream

Method

Melt chocolate on a low fire in bain marie.
Let cool for 4-5 minutes.
Whipe the heavy cream then add one third of it to the chocolate and mix quickly. Add the remaining of the whipped cream to the chocolate and fold it gently with a spatula working from the bottom to the top, until well incorporated. If too dry, you can thin the cream with some liquid heavy cream. Frost cupcakes using a tip and a pipping bag or by just using a spoon (like I did)


Sugar Hearts

Ingredients
1 cup custer sugar
Some food coloring
1 egg white


Method

1-Put one cup sugar with a bit of food coloring (use a skewer or the tip of a knife) do not put a lot of food coloring because when you add the egg white color will darken.


2-Add one teaspoon egg white and mix, you should have a wet sand like texture (do not add too much egg white or else sugar will dissolve)


3-put sugar on a flat surafce and smooth it with a rolling pin,then use a heart shaped cookie cutter to form the hearts. Use a large plastic spatula to lift the hearts from the surface into the pan.You can save yourself the trouble of breaking these hearts by just rolling them and cutting them straight onto a baking paper. (Why didn't I think about that before?)If hearts will not hold their shape, add more egg white in small increments and mix thoroughly. If sugar builds up in cutter, rinse with warm water and pat dry before continuing.


4- Place hearts on a lined baking sheet and bake for 10 minutes at 180°.


5-Let cool for 10 minutes , then leave sugar hearts in a dry corner to harden over night.


mercoledì 1 febbraio 2012

Pashtida please!


One of things that I love in the Jewish cuisine is the Pashtida, which means a casserole or a dairy pie. I learnt few things about the origin of this word, and if you like ,you can also read about it here

I was looking for something with cheese and vegetables to cook (not pasta!) and I started to search my old cook book that I brought with me from back home.I found an endless number of Pashtida recipes with variations of vegetables and the kinds of cheese.One particular recipe that caught my eye was with bell peppers,black olives and basil.I gave it a try and it was superb (my husband is Italian, so he loves all recipes that contain cheese in them)
Usually,you don't use flour in pashtida but you put some breadcrumbs at the bottom of the pan and sides to support the pashtida mix and give it a body. I chose to go one step further and put some breadcrumbs inside the pashtida, this way it becomes more solid when you cut it.


Happy winter and happy baking!


Bell Peppers And Black Olives Pashtida
makes 4 servings

Ingredients

1 large red bell pepper
1 large yellow bell pepper
50 gr black olives
Half cup plain yogurt
150 gr ricotta cheese
150 gr cream cheese
100 gr grated emmental
2 eggs
4 table spoons milk
Half cup breadcrumbs
4-5 basil leaves
Salt
Some grated parmesan cheese

Method


Wash and cut bell peppers into four halves, remove seeds and place in a pan in a preheated oven and leave to roast at 180°.When peppers are done, reomve gently the skin of them and cut into stripes.In a large bowl, put all cheese , eggs, yogurt,salt,bell peppers,olives , basil leaves and 3 tbs breadcrumbs.Mix all ingredients gently and pour into a 20cm rectangular pan that was greased with some oil and dusted with breadcrumbs. Finish by adding some grated parmesan to the top of the pashtida ,mix and bake in a preheated oven at 180° for 40 min. E voilà!

giovedì 5 gennaio 2012

Neighbours Affair


Yesterday, I went for a coffee at a neighbour's house taking DD along so she could play with her little son.We got to know each other some months ago at a condominium party (we met 4 years ago but never really had the chance to meet and talk) So I was really glad to go over there and chat over a coffee.

I thought about baking a cake that can go a long with the coffee, something simple but tasty at the same time.So I started to look into my kitchen cabbinates in order to find some ingredients that might inspire me for a cake.
Going through the stuff I had in there, I bumped into a box of popy seeds which I have bought sometime ago at the supermarket.Popy seed is not commonly used in the Italian kitchen and I have never seen yet anyone here using it in cake making.So I thought to myself :"why not?" and I started to prepare a cake that I used to make a lot when I was in college.It is a popy seed and raisins cake with a fresh lemony zest that fails not to impress everyone with it's simplicity yet very sophisticated twist (the popy seed).
You can prepare sugar glaze or just melt some dark chocolate and pour it on top to make a nice looking cake.I didn't do that on my cake ,I just took it with me the way it came out from the oven and it was really appreciated :-)


Happy Baking!


Popy seed and Raisins cake

Ingredients
for 24 cm ring pan

4 larg separated eggs
150 gr butter
200 gr (1 cup) sugar
A zest from one lemon
1 ts vanilla extract
70 gr (1/2 a cup) self raising flour
150 gr popy seed ( make sure it's minced)
5 tbs milk
2 tbs raisins
30 gr chopped walnuts ( I didn't have any so I used hazelnuts instead and it came out just fine)


Method


Preheat oven into 180°.
grease and dust a 24 cm round pan.
Mix butter with half of the sugar using an electric mixer.
Add egg yolks, lemon zest and vanilla, beat on a medium speed untill fluffy.
Mix the flour and the popy seeds and add in small batches to the butter mixture alternating with the milk.Add raisins and walnuts and mix gently with a spatula just until incorporated.
Beat egg whites with the remaining of the sugar (a little bit at a time) until a nice and stiff consistancy results in.Add to the butter and flour folding it gently from bottom to top, just until combined.Pour in the pan and bake for 35-40 minutes or until a skewer inserted in the middle of the cake comes out clean.

lunedì 2 gennaio 2012

New year's resolution


One year has gone by, another year has just came in.

I recieved the new year yesterday with my beloved family thinking about how

wonderful the year 2011 was.It was a year full of excitment, happy moments, self

develpomnet but most of all the year which I have recieved my second bundle of

joy,little Giovanni Amir.

I am not a list person,but as you grow older you realize that you can't escape

the "list" thing, starting with small reminders like: "buy milk and bread" and

ending with something as important as the new year's resolution list.For 2012 I wish

myfself and my family and loved ones health,love,joy and self development.As for my

list,here it is:

Loose weight (do you know anyone that doesn't have this on their list? ;-) )

Learn and master cake design skills (my biggest passion)

Take some yoga classes (I have two kids, did I already mention that ?)

Learn how to make a good pastry cream .

Learn how to make macroons.

Go to south france again (fell in love with Provance)

Understand and accept the different (I wish all of us would learn to do that)

Be a friend to another foreigner in this country.
These are the things that are mostly on my mind for the new year.

So to sweeten up the new year,I decided to post a recipe for a dessert which I found

very simple but yet very elegant and tasty. It's a panna cotta with a pomegranate

glaze.

I love the delicate sweetness of this dessert and the tangy-sweet flavor of

the glaze used on top.

It is taken from Gordon ramsay's christmas recipes.

So may we all have a sweet and tangy year like this beautiful dessert.

Selma

Panna cotta with pomegranate glaze
Makes 4 servings

Ingredients

2 medium gelatin sheets

250 ml heavy cream

50 gr sugar

15 ml dark rum, or any flavoring you prefare

For the pomegranate glaze:

20 gr sugar

275 ml pomegranate juice

Soak the gelatin sheets in 30 ml cold water .In the meantime, put cream,milk, sugar

and rum in a sauce pan. Bring to simmer and heat gently do not let it boil.

Remove from fire ,squeeze the gelatin sheets to remove any acssess

water and put in the sauce pan, stir until gelatin disolves completely.let cool

then pour cream into 4 serving glasses.Put in the fridge for at least 2 hours (I

recomend to leave it overnight)

For the pomegranate glaze, heat a frying pan then pour in the sugar and the

pomegranate syrup and bring it to boil.Let bubble for 10-15 min until thick and

sticky.Pour the glaze in a small mug and let cool,then pour the cooled glaze over

the setteled panna cotta.

Good cheers for the new year!